Create Effects

An effect is an uber-shader capable of representing a single shader or a large group of shaders. There are two types of effects in Evergine:
| Effect type | Description |
|---|---|
| Graphics Effect | Defines a rasterization pipeline with Vertex Shader, Geometry Shader, Hull Shader, Domain Shader, and Pixel Shader. These are useful for creating materials. |
| Compute Effect | Defines a compute pipeline with Compute Shader. These are useful for creating compute tasks and post-processing graph nodes. |
| Library Effect | Defines a collection of static variables, constants, directives, and reusable functions that can be referenced from your Graphics and Compute effects. By simply including the library in your effect files, you can centralize shared logic and keep your effect codebase clean and maintainable. Read more about Library Effect |
Create an Effect Asset in Evergine Studio
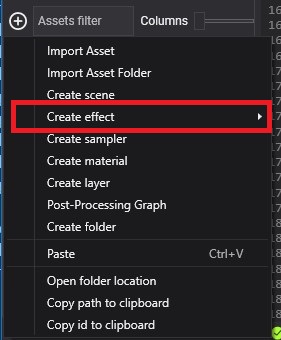
You can create an effect by clicking the button with ![]() from the Assets Details panel. This will open a create menu with options. Click on the option "Create effect->Graphics Effect, Compute Effect or Library Effect"
from the Assets Details panel. This will open a create menu with options. Click on the option "Create effect->Graphics Effect, Compute Effect or Library Effect"

Inspect Effects in Asset Details
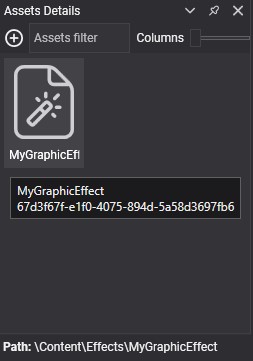
You can find the effect assets in the Assets Details panel when you select a folder in the Project Explorer.

Effect Files in the Content Directory
The effect file has the .wefx extension and is always accompanied by a folder with the same name as the effect. This folder contains the source code:

Effect Source Code Example
While effects in Evergine use HLSL as the shading language, it is enhanced by using different Metatags to automate some tasks and assist users.
A typical effect code looks like this:
[Begin_ResourceLayout]

    [Directives:UseTexture TEX_OFF TEX]

    cbuffer PerDrawCall : register(b0)
    {
        float4x4 WorldViewProj    : packoffset(c0);    [WorldViewProjection]
    };

    cbuffer Parameters : register(b1)
    {
        float3 Color            : packoffset(c0);   [Default(1, 1, 1)]
    };

    Texture2D ColorTexture       : register(t0);
    SamplerState ColorSampler    : register(s0);

[End_ResourceLayout]

[Begin_Pass:Default]
    [Profile 10_0]
    [Entrypoints VS=VertexShaderCode PS=PixelShaderCode]

    struct VS_IN
    {
        float4 Position : POSITION;
        #if TEX
        float2 TexCoord : TEXCOORD;
        #endif
    };

    struct PS_IN
    {
        float4 Pos : SV_POSITION;
        #if TEX
        float2 Tex : TEXCOORD;
        #endif
    };

    PS_IN VertexShaderCode(VS_IN input)
    {
        PS_IN output = (PS_IN)0;

        output.Pos = mul(input.Position, WorldViewProj);

        #if TEX
        output.Tex = input.TexCoord;
        #endif

        return output;
    }

    float4 PixelShaderCode(PS_IN input) : SV_Target
    {
        float4 color = float4(Color,1);

        #if TEX
        color *= ColorTexture.Sample(ColorSampler, input.Tex);
        #endif

        return color;
    }

[End_Pass]
An effect file in Evergine is divided into the following sections:
- Resource Layout definition
- List of Passes
Resource Layout Definition
This block of code defines all resources (Constant Buffers, Structured Buffers, Textures, and Samplers) that will be used in your shaders. This section is enclosed between [Begin_ResourceLayout] and [End_ResourceLayout] tags.
[Begin_ResourceLayout]

    [Directives:UseTexture TEX_OFF TEX]

    cbuffer PerDrawCall : register(b0)
    {
        float4x4 WorldViewProj    : packoffset(c0);    [WorldViewProjection]
    };

    cbuffer Parameters : register(b1)
    {
        float3 Color            : packoffset(c0);   [Default(1, 1, 1)]
    };

    Texture2D ColorTexture        : register(t0);
    SamplerState ColorSampler    : register(s0);

[End_ResourceLayout]
In this example:
[Directives:UseTexture TEX_OFF TEX]: This section contains a Directive (calledUseTexturein this example), which allows the users to enable different features in their effect.- This directive specifies two macros (
TEX_OFFandTEX) which indicate whether this shader will use a color texture or not. In your effect code, you are free to define any number of directives as you wish. The tradeoff is that the number of possible effect combinations rises exponentially in proportion to the number of directives. - You can enable or disable features using macros in your shader with the
#if,#else, and#endifpreprocessor directives.
- This directive specifies two macros (
- The definition of two constant buffers, a Texture2D, and a SamplerState:
cbuffer PerDrawCall : register(b0) { ... }: A constant buffer.cbuffer Parameters : register(b1) { ... }: A second constant buffer.Texture2D ColorTexture : register(t0);: A texture 2D.SamplerState ColorSampler : register(s0);: A Sampler state.
- You will notice that you can add metatags to your constant buffers' attributes to specify default values or to inject useful engine parameters. In the example, we are using:
- The
[WorldViewProjection]to inject the object's world view projection matrix. - The
[Default(1, 1, 1)], which indicates the default value of theColorattribute (white color in this example).
- The
Most of the topics mentioned here are detailed in the Effect Metatags document.
List of Passes
After the Resource Layout block, your code will specify a list of Passes. Each Pass is defined using the [Begin_Pass] and [End_Pass] tags. Each pass requires a name, which will be used by the render path. As a naming convention, all render paths in Evergine must support the Default pass name.
In the previous effect example, a Default pass is defined:
[Begin_Pass:Default]
    [Profile 10_0]
    [Entrypoints VS=VertexShaderCode PS=PixelShaderCode]

    struct VS_IN
    {
        float4 Position : POSITION;
        #if TEX
        float2 TexCoord : TEXCOORD;
        #endif
    };

    struct PS_IN
    {
        float4 Pos : SV_POSITION;
        #if TEX
        float2 Tex : TEXCOORD;
        #endif
    };

    PS_IN VertexShaderCode(VS_IN input)
    {
        PS_IN output = (PS_IN)0;

        output.Pos = mul(input.Position, WorldViewProj);

        #if TEX
        output.Tex = input.TexCoord;
        #endif

        return output;
    }

    float4 PixelShaderCode(PS_IN input) : SV_Target
    {
        float4 color = float4(Color,1);

        #if TEX
        color *= ColorTexture.Sample(ColorSampler, input.Tex);
        #endif

        return color;
    }

[End_Pass]
In this pass, you will find:
- The
[Entrypoints VS=... PS=...]tag, which defines the entry point for each render pipeline stage. In the example, you are indicating that this pass will use the following entry points:VS=VertexShaderCode: During the Vertex Shader stage, the VertexShaderCode function will be executed.PS=PixelShaderCode: During the Pixel Shader stage, the PixelShaderCode function will be executed.
- After that, typical HLSL shader code is written. You are free to define structures, and functions, and use all resources defined inside the Resource Layout section.
As mentioned earlier, visit the Effect Metatags document for more information.
Create a New Effect from Code
The following sample code can be used to create a new effect and its associated material to apply to an entity in your scene.
protected override void CreateScene()
{
    protected override void CreateScene()
    {
        var graphicsContext = Application.Current.Container.Resolve<GraphicsContext>();
        var assetsService = Application.Current.Container.Resolve<AssetsService>();

        string shaderSource = @"
            [Begin_ResourceLayout]

                cbuffer PerDrawCall : register(b0)
                {
                    float4x4 WorldViewProj    : packoffset(c0);    [WorldViewProjection]
                };

                cbuffer Parameters : register(b1)
                {
                    float3 Color            : packoffset(c0);   [Default(1.0, 0.0, 0.0)]
                };

            [End_ResourceLayout]

            [Begin_Pass:Default]
                [Profile 10_0]
                [Entrypoints VS=VS PS=PS]

                struct VS_IN
                {
                    float4 Position : POSITION;
                    float3 Normal    : NORMAL;
                    float2 TexCoord : TEXCOORD;
                };

                struct PS_IN
                {
                    float4 pos : SV_POSITION;
                    float3 Nor : NORMAL;
                    float2 Tex : TEXCOORD;
                };

                PS_IN VS(VS_IN input)
                {
                    PS_IN output = (PS_IN)0;

                    output.pos = mul(input.Position, WorldViewProj);
                    output.Nor = input.Normal;
                    output.Tex = input.TexCoord;

                    return output;
                }

                float4 PS(PS_IN input) : SV_Target
                {
                    return float4(Color,1);
                }

            [End_Pass]
        ";

        // Create effect
        Effect myEffect = new EffectFromCode(graphicsContext, shaderSource);

        // Create associated material
        Material myMaterial = new Material(myEffect)
        {
            LayerDescription = assetsService.Load<RenderLayerDescription>(EvergineContent.RenderLayers.Opaque),
        };

        // Apply to an entity
        Entity primitive = new Entity()
                .AddComponent(new Transform3D())
                .AddComponent(new MaterialComponent() { Material = myMaterial })
                .AddComponent(new SphereMesh())
                .AddComponent(new MeshRenderer());

        this.Managers.EntityManager.Add(primitive);
    }
}