Getting Started
Follow these steps to prepare your environment for running XRV on your target device.
Project Setup
1. Create a new project
Use Evergine Launcher to start a new project. Along with Windows, select an additional template for your target device. For Meta Quest or Pico headsets, you can choose from two different templates.
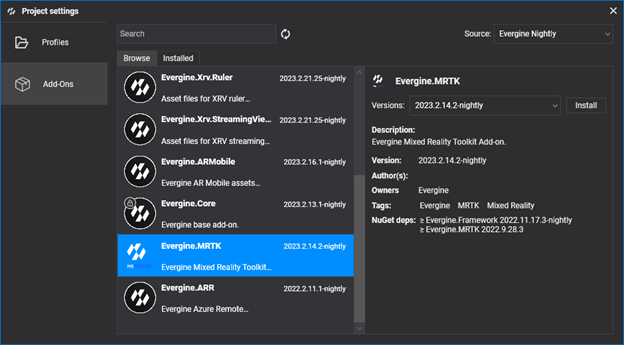
2. Add the MRTK Add-on
Open Evergine Studio and add the MRTK add-on to your project. Refer to this guide for instructions on adding add-ons.
3. Add the Evergine.XRV.Core Add-on
With MRTK installed, add the Evergine.XRV.Core add-on via the project management dialog.

Note
XRV add-ons are available as NuGet packages. For nightly builds, update nuget.config to include the Evergine nightly feed:
<?xml version="1.0" encoding="utf-8"?>
<configuration>
  <packageSources>
    <add key="nuget.org" value="https://api.nuget.org/v3/index.json" />
    <add key="Evergine Nightly" value="https://pkgs.dev.azure.com/plainconcepts/Evergine.Nightly/_packaging/Evergine.NightlyBuilds/nuget/v3/index.json" />
  </packageSources>
</configuration>
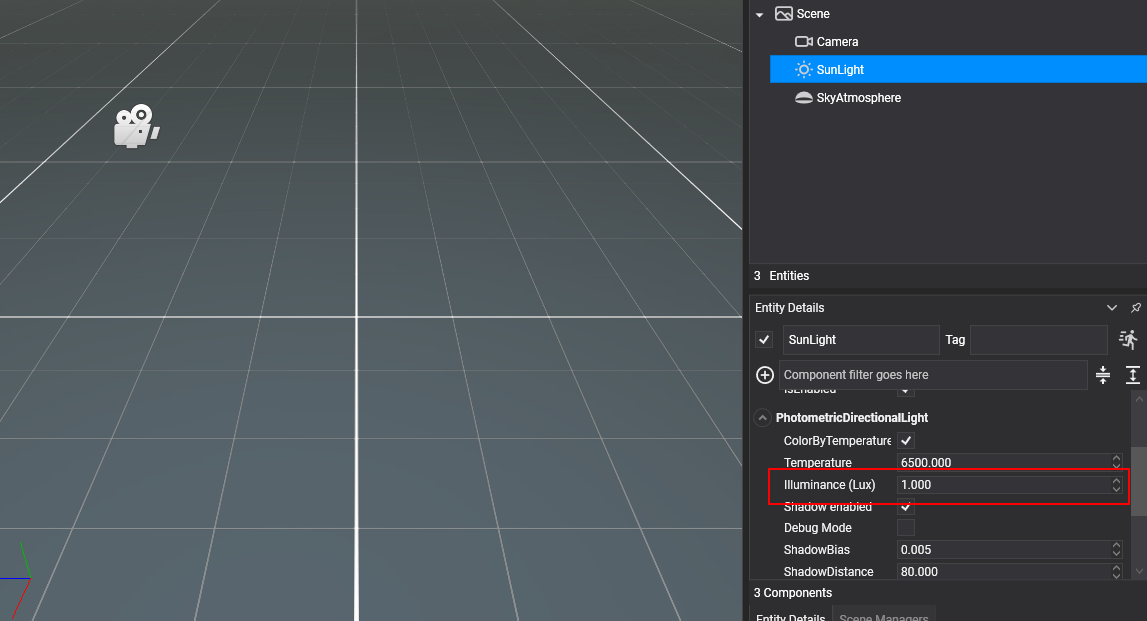
4. Adjust SunLight Illuminance
In your default scene, set the SunLight entity’s Illuminance value to 1.
Code Setup
1. Configure the Application Constructor
Register the background scheduler in your Application constructor.
public MyApplication()
{
    this.Container.RegisterType<Settings>();
    this.Container.RegisterType<Clock>();
    this.Container.RegisterType<TimerFactory>();
    this.Container.RegisterType<Random>();
    this.Container.RegisterType<ErrorHandler>();
    this.Container.RegisterType<ScreenContextManager>();
    this.Container.RegisterType<GraphicsPresenter>();
    this.Container.RegisterType<AssetsDirectory>();
    this.Container.RegisterType<AssetsService>();
    this.Container.RegisterType<ForegroundTaskSchedulerService>();
    this.Container.RegisterType<WorkActionScheduler>();

    BackgroundTaskScheduler.Background.Configure(this.Container);
}
2. Implement XRScene in Your Scene Class
Modify your scene class to inherit from XRScene.
public class MyScene : XRScene
{
    protected override Guid CursorMatPressed => EvergineContent.MRTK.Materials.Cursor.CursorPinch;

    protected override Guid CursorMatReleased => EvergineContent.MRTK.Materials.Cursor.CursorBase;

    protected override Guid HoloHandsMat => EvergineContent.MRTK.Materials.Hands.QuestHands;

    protected override Guid SpatialMappingMat => Guid.Empty;

    protected override Guid HandRayTexture => EvergineContent.MRTK.Textures.line_dots_png;

    protected override Guid HandRaySampler => EvergineContent.MRTK.Samplers.LinearWrapSampler;

    protected override Guid LeftControllerModelPrefab => Guid.Empty;

    protected override Guid RightControllerModelPrefab => Guid.Empty;

    protected override float MaxFarCursorLength => 0.5f;

    //...
}
3. Add Microsoft.Bcl.AsyncInterfaces Package
Include Microsoft.Bcl.AsyncInterfaces in your shared project:
<PackageReference Include="Microsoft.Bcl.AsyncInterfaces" Version="7.0.0" />
4. Initialize XrvService
Set up an XrvService instance within OnPostCreateXRScene.
MyApplication.cs
public override void Initialize()
{
    base.Initialize();
    this.InitializeXrv();

    // ...
}

private void InitializeXrv()
{
    var xrv = new XrvService();
    this.Container.RegisterInstance(xrv);
}
MyScene.cs
protected override void OnPostCreateXRScene()
{
    base.OnPostCreateXRScene();
    var xrv = Application.Current.Container.Resolve<XrvService>();
    xrv.Initialize(this);
}
Platform Setup
Android
If you encounter build errors like the following:
error XA2002: Cannot resolve reference: `Evergine.Editor.Extension`, referenced by `Evergine.MRTK.Editor`. Please add a NuGet package or assembly reference for `Evergine.Editor.Extension`, or remove the reference to `Evergine.MRTK.Editor`.
Add Evergine.Editor.Extension to your project. For passthrough capabilities, uncomment related code in MainActivity.cs and in the Android manifest.
Also, to make use of the passthrough capability, remember to uncomment the related parts of your code in MainActivity.cs and in the Android manifest file.
Add More Modules
At this point, you can open the hand menu with default buttons for Settings and Help. To extend functionality, consider adding any XRV modules, creating your own module, or using the XRV API to add new elements.

You can also take a look at our XRV sample that includes all our public modules.